A complete skateboard must be composed of different parts, including the skateboard deck, wheels, trucks, etc. In the previous article, we shared about the production of skateboard wheels. In this article, we will share with you the deck design process in the production of skateboards.

The design of a skateboard deck can be divided into two aspects: size and color, respectively.
Size
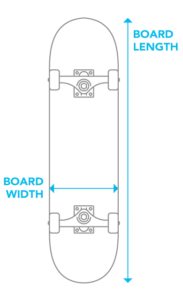
The dimensions of the skateboard design should be 9 inches x 32.5 inches (or 23 cm x 83 cm). The skateboard design must bleed at least half an inch or 1.3 cm. The design is screen printed on heat transfer paper and transfers the heat to the skateboard deck. This allows the screen printing ink to be firmly anchored in the wood fibers of the skateboard deck.
The heat transfer was placed on the skateboard deck by hand. It is impossible to manually place each heat transfer in the same position with 100% accuracy. The 1.3 cm bleed provided us with 0.65 cm (0.256 in.) of space on each side to ensure the design fit the entire surface of the deck.
Colors
Skateboard designs are printed in spot colors or CMYK silk screens. Most professional brands use spot colors for a small number of different color designs. Spot colors are mixed before printing to produce solid and transparent colors.
Designs containing 5 or more colors are usually printed in CMYK. CMYK printing means the design is divided into tiny dots of cyan, magenta, yellow and black. These dots are so small that they are almost invisible to the human eye. The dots are printed so closely that the human eye perceives them as a separate colors. For example, a surface filled with cyan and yellow dots looks green. This is the same process you use at home with your printer, the difference being that we screen print these dots.
In contrast, spot colors look stronger and denser than CMYK colors. Spot colors are also much more accurate than CMYK. Brightness, saturation, and color are different for each monitor. If you bring your printer to print your deck design at home, you will find that the colors look different than the design on your computer.
You can test this at home with your printer: print a 100% cyan surface and a green surface. When looking closely, you will see that cyan is a pure color. However, green consists of small cyan and yellow dots.
.jpg)
White is the color of the background. So, just as your printer at home can create a perfect white by leaving blank space on the paper, CMYK skateboard designs can create clean white dots by not printing. But remember, if a small dot of no more than 3 mm is left blank in a CMYK design, the surrounding dots will fill it up. If you use a precise white design – prepare the “white” as a different spot color.
Your design area can remain transparent to show the wood deck finish below the print. By switching the color of the baseboard veneer, you can create multiple colorways using the same print. This is often used to save on print setup costs. However, while white is usually a free color because it is used as a base layer, adding transparency is counted as a color! When adding transparency, we cannot print an all-white base layer but must create a white film to keep the transparent areas free.
The above is the process we need to involve when designing a skateboard deck, which is equivalent to making a good skateboard deck design. Of course, after making the design, we need to produce the next step. We must send the design file to the manufacturer if we are designing it ourselves. The file should preferably be a vector image in AI or PDF format to get the best printing effect. If you don’t know how to design, you can also look for a skateboard manufacturer like Jiesen that provides all-inclusive design services. We have a professional design team that can design a deck to your satisfaction according to your needs.
If you need to customize or purchase skateboards or decks, you are welcome to contact Jinsen, and if you are interested, you can browse our product design through our product section.


